 Welcome back!
Let's talk about eye brushes. You can be as versatile with these guys as you want, and your look will be just as perfect as if you had a personal makeup artist. What do they do anyways? Crease brushes - These fellas are going to apply your all over transition shade to help blend the other colors you decide to put on. If you want a more blown-out, smokey effect, use a fluffy crease brush. If you're going for a more precise look, use a crease brush that's a little denser. Flat definer brush - Don't laugh when I tell you that the one pictured above (second to the left) is actually a paint brush. See what I mean when I say versatile? A flat definer brush can help you create the look of eyeliner on your bottom lashline if you don't want something as dramatic as actual eyeliner. It's also perfect for those of you who are not comfortable applying liner just yet (great for beginners). Pencil brushes - A pencil brush is essentially what it's called; it looks and feels as if you're holding a pencil. You can use it for blending a soft cut-crease, or smoking out the lower lashline. Angled brushes - An angled brush is genius for applying gel liner, or even applying eyeshadow where you'd normally put liner. Flat shading brush - This is different from a flat definer. A flat shader is your standard brush that will apply the main color right onto your eyelid. If you want your color to be pigmented and precise, go for a dense brush set. Brow/lash brush - The funky looking little guy in the picture with two sides, that's going to be a lifesaver if you don't have a spoolie to brush your eyebrows. The other side is to remove any clumps that your mascara may create in your lashes. Hope this helps! Hope to see you guys next time. Much love, Patricia.
0 Comments
Welcome back to my blog lovelies!
If you were here to read my first official blog post, it was just a test to make sure I got the blog up and running well. Now on to the fun part... I've got a lot of things planning for SGAB in 2017. Beauty, advice, fun, etc... The plan is for me to post every Thursday weekly. If you have any suggestions or ideas, please feel free to drop a comment below or send a message through the Contact form. I want this to be a positive, uplifting environment that glorifies Jesus. Good luck with all of your New Year's resolutions, and may 2017 be your year of success. With love, Patricia 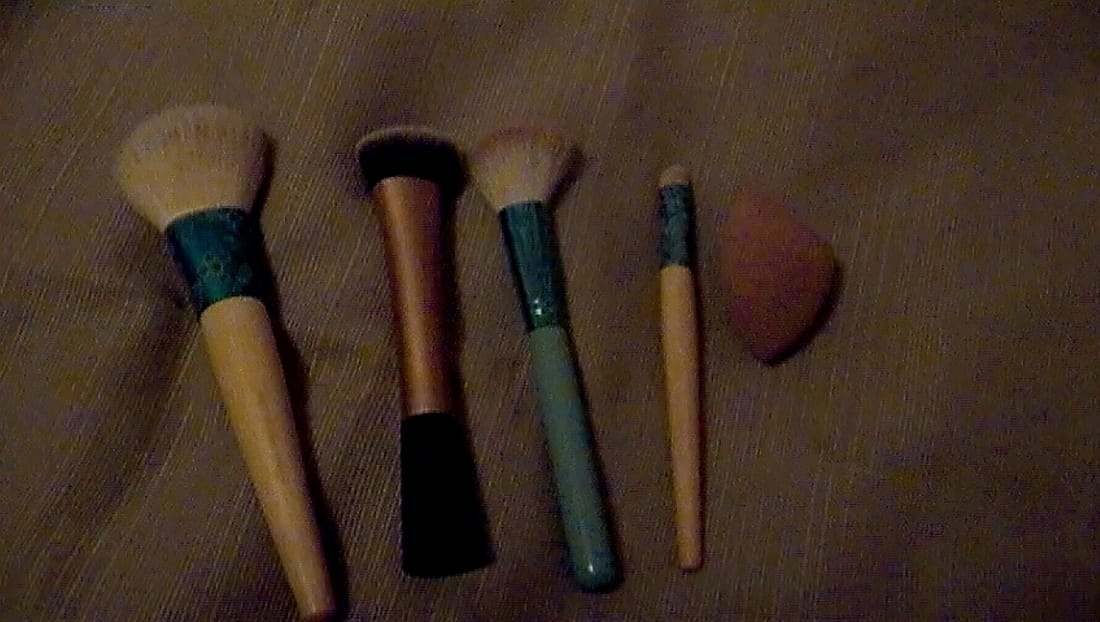 Let's talk makeup brushes today. They always say that if you use the right tools for any type of job, the outcome will always be perfect. Same goes with makeup; if you have the right brushes, you will have a flawless look that the whole world will be able to enjoy.
Let's start with the face. Above is a picture of several of my brushes from my kit. They are from many different brands, so there's no point in me trying to list them all. Anyways, the first thing I want to talk about is the sponge. There are tons of them out there on the market now. Drugstores sell dupes of them for those of you who are a little more budget-friendly. So what does a beauty sponge do? If you dampen the sponge, it will help blend your base without the hustle of a brush. It's a fool-proof way to make sure your foundation and concealer are spot-on. I personally like to use it for my cream contour as well. Speaking of concealer, that itty bitty brush you see in the image is my favorite to use when I'm trying to cover small imperfections or the inner corner darkess that everybody gets (if you don't, I'm jealous). It's wonderful for color-correcting under the eyes too. The big powder brush to the far left is one of my favorites because I can use it for many different purposes. First, it can be used for its obvious purpose: setting your base with a powder. It doesn't pick up a lot of product which means you won't walk out the door with a cake-face (that doesn't look cute on anyone, trust me). I also like to use it for an all-over bronzer when I'm not looking for a structured contour, and if I want a quick sweep of blush, this is my best friend. The angled blush brush is a good alternative for those of us with long faces. We can place the product on the cheeks without worrying we're going to get it everywhere. Again, contouring is super-easy with this kind of brush. Now let's move on to the classic foundation brush. This little buddy can come in handy whether you want full coverage for a night out, or just a casual sheer coverage look. It's perfect for cream contour when you want a dramatic cheekbone. If you don't want to pull out another brush to set your face with a powder, just pat a little on this brush and you're good to go! The next beauty post will be all about eye brushes. There, you'll learn how to choose which brush to use for what kind of look on your eyes, and I will give you a few shortcuts when you're out of money or time. Thanks for stopping by! |

Archives
August 2020
Categories |
 RSS Feed
